Using F-Engrave to Make V-carved Signs

While I had done a few CNC projects using flat end mills, I had not learned the fun of v-carving. This is a method of using a v-shaped bit to make lines of varying widths by cutting deeper or shallower into the material. Typically it is used for lettering and graphics in signs.

Recently, someone contacted me and asked if I could show her how to use her CNC machine that she bought last year to make v-carved signs. I did as much study as I could through YouTube to learn about the software that came with her machine. During my time with her, I got a chance to enjoy the $700 software package that is VCarve Pro. It was fairly easy to understand and use. However, the price tag is much more than I wanted to spend for software that I might use a few times a year.

There are a few other programs that do similar things, but the one I have experience with is Easel Pro (which is the software of choice for my CNC). But at $25 a month for a feature that I might or might not use during the month, I was still left searching for something more reasonable (even if it wasn’t as easy to use).

I’m not against paying for software; especially software that could potentially help me earn money in return. It can be an investment. But, I’m not primarily looking to make money with my CNC projects. I do the projects I do mostly out of personal enjoyment.

Enter F-Engrave

I have seen F-Engrave come up as an open source option for a couple of years. But, it has also been terribly confusing for me to wrap my head around. Having enjoyed the ease of VCarve and the cool effect that v-carving can give, I had to take the time to figure this out.

Screenshot of the opening screen of F-Engrave
The opening screen to F-Engrave.

As is typical with open source software (I am a big fanboy), there is amazing power wrapped up in a less than stellar user interface. Front and center in F-Engrave is the ability to input text and carve it out all in one screen. However, this hides the fact that this is a powerful tool for creating intricate inlays and v-carving any design you can create in a design tool like Inkscape, CorelDraw or Adobe Illustrator.

I made a video on how to use the software, but also have written more detailed instructions here.

Importing Artwork

To import your artwork, you need to have saved it in DXF format from your design software. This can be text or actual art.

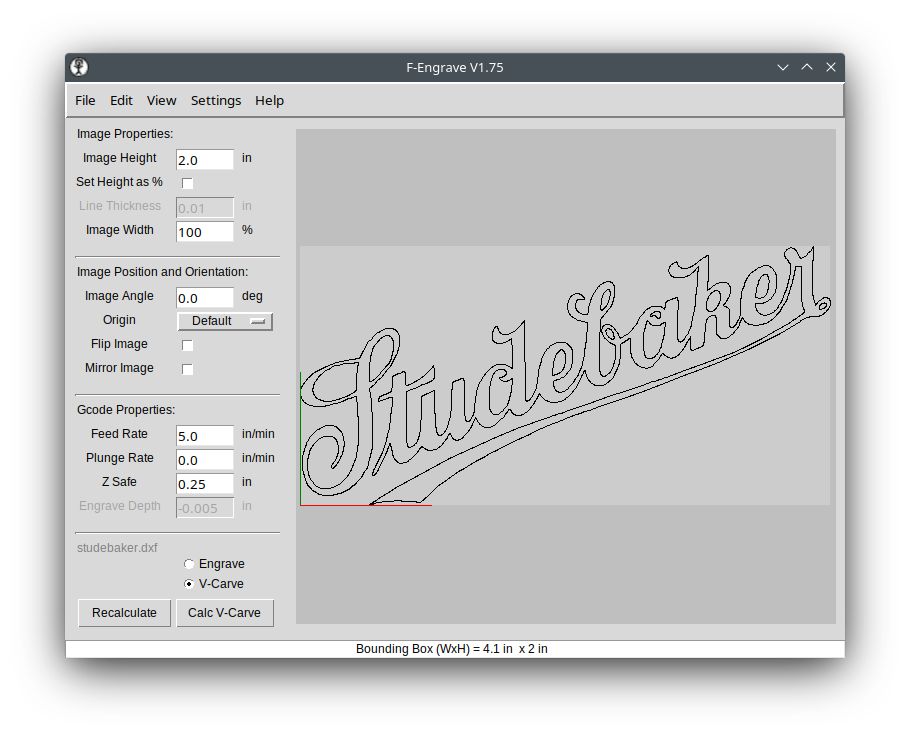
You can see I imported the Studebaker logo that I created in Inkscape by clicking File | Open DXF and navigating to my art to open it.

Artwork opened in F-Engrave.

Settings Explained

Following are the settings that are needed to do a v-carve. However, I don’t completely understand every option the software has to offer. For example, everything we are doing here to create a positive v-carve can be inverted to make a perfectly fitting inlay. But I’m still trying to figure some of that out.

V-Carve Radio Box

At the bottom of the left-hand column, there is the V-Carve radio box. Select that. Even though it is the bottom of the column, it is important to choose that so that we have the correct options presented to us in the next steps.

Image Properties

Image Height is the final height of your art on the work piece. This defaults to 2 inches and is probably something that you will need to change unless you actually want your final art to be 2” tall.

Set Height as %. I am not sure why you would use this. A percentage of what?

Image Width is in percentage, but that is in relation to the height. 100% means that it will be normally proportional to the image height. Less than 100 and the image will be scrunched left to right. More than 100 and it will be stretched.

Image Position and Orientation

Image Angle is used to turn the image from horizontal to vertical or any position in between. You can play with the number and see what that does. Typically, this will be left at 0.0.

Origin is where you want to set the X0,Y0 (work home position) on your CNC machine. Typically this will be the bottom left or center of your artwork. To start your origin in the bottom left corner choose Default or Bot-Left (the same thing when using art) in the drop down menu. For a center origin choose Mid-Center.

Flip Image and Mirror Image are used for inlays. You will probably not use these for normal v-carving. You can click the check boxes to see what they do.

Gcode Properties

This is where you set the speed and plunge rate of your travel moves.

For wood, I have been doing 25 in/min using an X Carve machine. If your CNC is a smaller desktop version you may want to go much slower than that.

Plunge Rate should be something in the 5-10 in/min range unless you know your machine can handle something faster. The default of 0 copies whatever the feed rate is that you set in the box above.

Z Safe is how high above the work piece the machine will move before a travel move.

Calc V-Carve

At this point you can hit the Calc V-Carve button and see the results of your settings. But there is another screen we must look at before you can save your project and cut your sign.

After clicking the Calc V-Carve button.

Settings | V-Carve Settings

The Settings screen.

For our purposes, here are the things you need to choose and modify from the Settings screen.

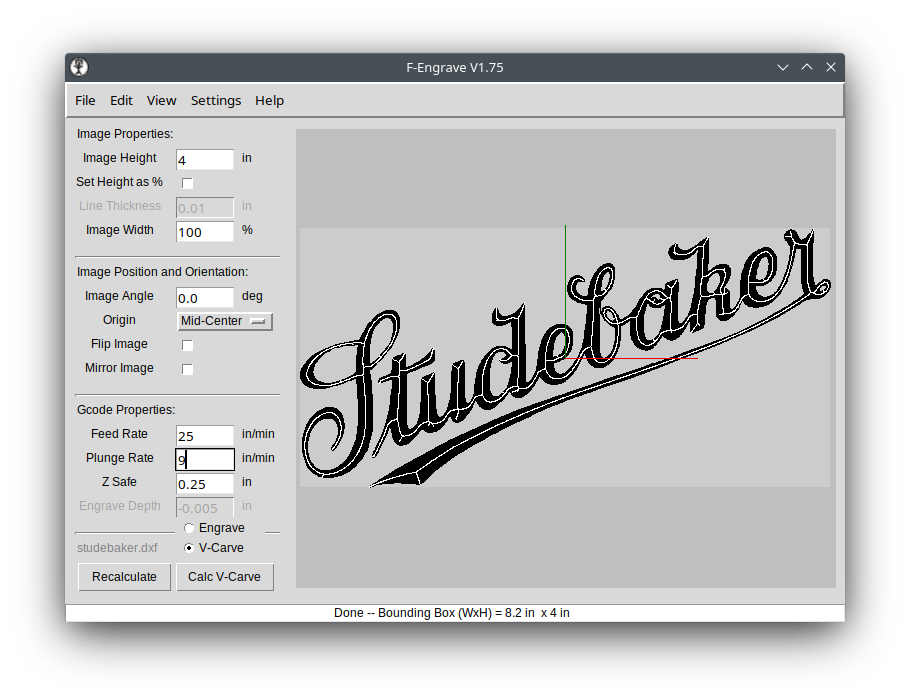
Cutter Type will be a V-Bit. However, you can get similar but different results from the Ball Nose option.

V-Bit Angle is usually 90, 60, 45 or 30 degrees. Type in the angle of your bit.

V-Bit Diameter is the largest width of your bit. I usually use a ¼” router bit, meaning a ¼” shaft. But, that is not the number this option is looking for. This needs to be the size of the cutting area of the bit which will usually be larger than your bit’s shaft.

Cut Depth Limit is set to 0 by default. That means that the next line down is how deep the final cut will be. In my example it will be -0.433 inches. There is nothing you need to put in the Cut Depth Limit box unless the depth shown in the Max Cut Depth line is too deep for your material or deeper than you would like it to be.

If you need to adjust the Cut Depth Limit, then you need to type a negative number in the box.

At this point you could click the Calculate V-Carve button and be ready to save your gcode.

If Done, Save Gcode

On the main screen of F-Engrave you can click File | Save G-Code to save your code. The default file format is .ngc. That may or may not be readable by your CNC control software. If it is, then you can save the file in that format and then send it to your CNC.

In my case, my control software of choice (right now it is OpenBuildsCONTROL) does not recognize the .ngc format. But, you can also manually change the file extension to .gcode if needed. Either way, it is a simple text file that is being created.

Optional Steps

Cleanup

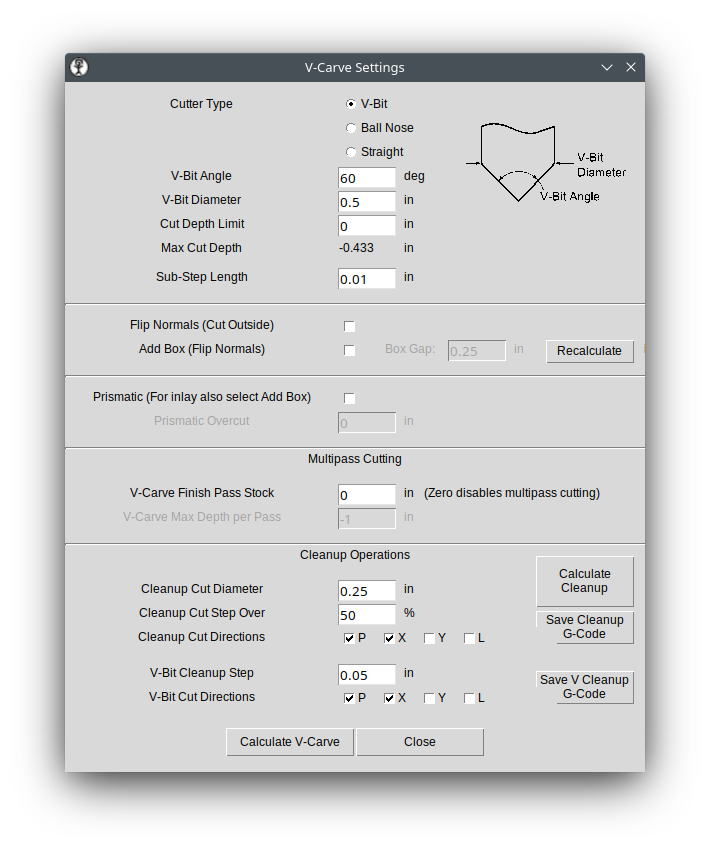
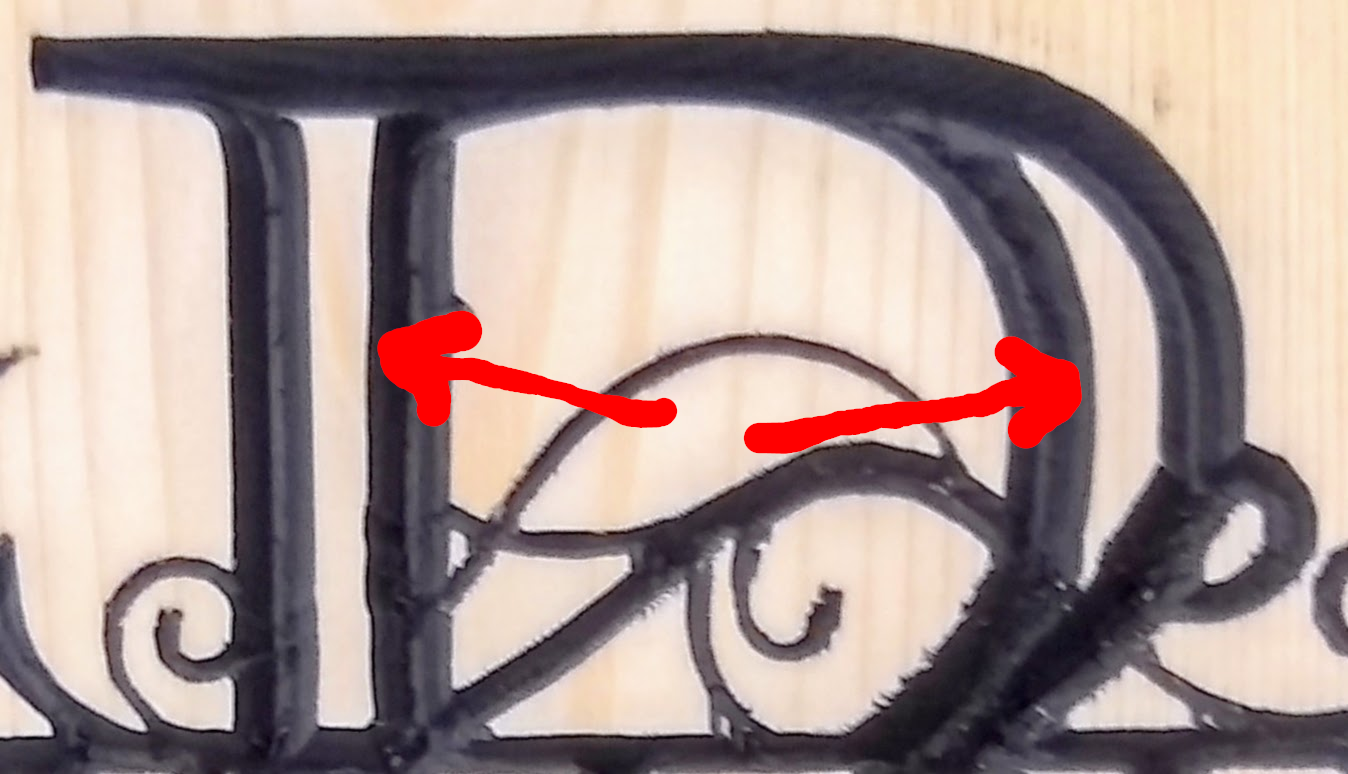
If, after calculating the v-carve you find that there are sections in your carve that have two white lines in a single section of the letter (like in the image below), then you will want to calculate a cleanup path.

Double white lines in the middle of an art stroke indicate you need to calculate a cleanup cut.

Go back to the Settings | V-Carve Settings screen. At the bottom right you will see a Calculate Cleanup button. Leaving the settings at their default values, you can create a cleanup path that will use a ¼” end mill to flatten out the bottom of the carving. Why one would need to do this only became obvious to me once I did a cut that needed it.

In the following image the red arrows are pointing to areas within the letter that should have been carved out during the v-carving process. However, since the letter was so wide, the bit was not able to carve out the area needed without going too deeply into the wood. This is where a cleanup toolpath will flatten out that space inside the letter.

The red arrows show the area that needs a cleanup cut performed.

After clicking the Calculate Cleanup button, click Save Cleanup G-Code and save the cleanup toolpath. Again save it as an .ngc file or .gcode file as needed.

Run the main gcode file first on your machine, then the cleanup gcode after changing to a ¼” bit (or whatever size you specified in the Cleanup Cut Diameter box).

Settings | General Settings

In the General Settings dialog box you can choose whether your units are inches or millimeters. All the other settings are probably important for something, but I have yet to figure them out. You may need to adjust the G Code Header and G Code Postscript for your machine. I was fairly successful in finding what those fields do by searching on Google.

Final Steps

Take the gcode file that was created and run it on your machine by using the CNC control software for your machine. This may be Easel, Universal Gcode Sender, Mach 3|4, OpenBuildsCONTROL, Ready2Control, LinuxCNC or many other control software options.

Actually controlling and sending the code to your machine is beyond what I can do here and keep this general enough for all machines.

Other Features

The other great thing that F-Engrave can do, that I do not yet understand, is inlays. You are able to cut the inverse of the v-carve that we just did in another piece of wood and glue them together for a perfect match. Explaining that will have to wait until I get tired of this process and am ready to spend the time to learn the workflow. There are videos on this process, I just haven’t been able to wrap my head around the steps.

As mentioned at the beginning, I have done a video on the v-carving process that may be a bit easier for you to follow.

Voltage Divider: Power Supply Monitor

I had a power supply that was suspected as faulty at my office. I put together a voltage divider on an Arduino with an SD card data logger to keep track of the voltage coming out of the unit. See the caveats at the end to learn why this can’t be the only test you do.

It turned out, in this case, that the problem was the UPS the computer was plugged into. The battery was fully charged and had sufficient capacity. But the unit would randomly act like an electrical failure had occurred but would not make the switch to battery power. We experience frequent short power losses at our office (on average more than 1 a week). It is likely that the unit has been damaged by these regular power failures over the years that it has been in place. Fortunately, it is the unit that is shielding the computer from taking the hit on this.

This is one of those blog posts that I’m really writing for myself so that I can come back and find out how I did something if I need to do this again in the future. I’m just inviting the public to read over my shoulder.

Building a Power Supply Monitor

I had not previously worked with monitoring voltage with an Arduino, but I knew it was possible. I also knew that the answer was by using a voltage divider. However, I didn’t know how they worked, so I had a little studying to do. I understand the math behind it, but I still haven’t wrapped my head around what is actually happening electronically. Mostly it is because it works and I haven’t really tried to understand it.

Why Use a Voltage Divider

The need for a voltage divider is so that you can feed a higher voltage into an analog pin of the Arduino without destroying the Arduino. The analog pin can only take 5V in. Any more than that and you will destroy the unit (how much more makes it melt down is unknown by me, but I suspect it wouldn’t take much).

Since I wanted to measure the 12V output of the power supply, I needed to step down 12V to no more than 5V. But I didn’t want to use a voltage regulator that would give me a smooth 5V out. If I did that then I’m not actually monitoring the power supply output. I needed a way to vary the 5V going into the Arduino in relationship to how much the 12V fluctuates.

I could have measured the 5V or 3.3V outputs of the power supply, but I didn’t think those would have as much fluctuation as the 12V might if there was a problem with the supply. While those would have been simpler, and potentially not needed a voltage divider, if the 5V or 3.3V outputs spiked over 5V then it would have destroyed the Arduino. And, since I suspected there was a problem with the supply, I worked under the assumption that they might be spike over their intended voltage.

Voltage Divider Concept

The idea of the divider is that you can feed in 12V (or, in the way I set mine up, anything up to 48V) and it will proportionally divide the supply voltage down to less than 5V. Any fluctuation in the input voltage affects the output voltage. In this way you can monitor voltage drops or spikes safely with a 5V tolerant analog pin of an Arduino.

Vout = Vin * (R2 / (R1 + R2))
Image Credit: SparkFun

The math is fairly simple. As you can see from the image above the output voltage is equal to voltage in times the value of resistor2 divided by resistor1 and resistor2 added together. There are calculators online that can do the math for you based on resistors you have available. The key is that you never want your output voltage to go over 5V. Therefore you should add in a bit of a buffer in case the voltage at your supply spikes for some reason.

In my case I wanted my output voltage to never be greater than 5V. I had a handful of resistors that I measured with a continuity tester. What worked for me was a 33K (which measured out to 32.7K) and a 3.9K (measured at 3.8K) resistor which would give me a 48V input max. I would have liked my tolerance to be a bit lower (20V) so that I felt like I got more resolution on my final reading, but these were the resistors I had handy.

Code

Here’s the code that I used. The original author of the code is T.K.Hareendran that I got from the ElectroSchematics website. I have modified it to work for my project and therefore have taken his name off of it. But it might be beneficial to read his site on how it works or if you want to add an LCD display to the unit.

#include 
#include 

File myFile;

int pinCS = 10;
int analogInput = A0;
float vout = 0.0;
float vin = 0.0;
float R1 = 32700.0; // resistance of R1 (32.7K)
float R2 = 3800.0; // resistance of R2 (3.8K)
int value = 0;

void setup() {
  Serial.begin(9600);
  pinMode(analogInput, INPUT);
  pinMode(pinCS, OUTPUT);
  if (SD.begin()) {
    Serial.println("SD card is ready to use.");
  } else
  {
    Serial.println("SD card initialization failed.");
    return;
  }
  Serial.println("DC VOLTMETER");
}

void loop() {
  // read the value at analog input
  value = analogRead(analogInput);
  vout = (value * 5.0) / 1024.0; // Analog input reads voltage as a percentage from 0-1024
  vin = vout / (R2 / (R1 + R2));
  if (vin < 0.09) {
    vin = 0.0; //statement to quash undesired reading !
    //analogInput = analogRead(0);
  }
  Serial.println(vin);

  //Create or Open file
  myFile = SD.open("Voltage.txt", FILE_WRITE);

  if (myFile) {
    myFile.println(vin);
    myFile.close();
  } else
  {
    Serial.println("Error opening test.txt");
  }
  delay(1000);
}

Caveat

This is not a perfect solution for several reasons, but it does (potentially) give enough information that can help me know for certain that the power supply is faulty. However, it can't tell me that it is not faulty because this particular power supply has 3 independent 12V outputs. A whole section of the supply can die and not affect the other 2. If I'm testing a good section there still could be 2 others that are faulty.

The problem, in this case, ended up being a bad UPS. However, if I had monitored this power supply for a few days I may still not have caught a true power supply problem. This circuit can really only tell me if the supply is faulty. It can't determine if it is definitively good. And, it may not present as faulty on the output I'm using during the test period. Therefore, there are plenty of ways that this circuit may not detect a faulty supply and it can never convince me that the supply is definitely not faulty. It only tests a small subset of potential power supply problems.

Conclusion

While, as mentioned, it cannot tell me if a supply is absolutely good, it does give me a chance to test the supply under load. That is one of the reasons I have not invested in a particular type of power supply tester---you can't test under load.

This does, however, help explain how a voltage divider can be used and how to read a higher voltage using an Arduino that is limited to 5V input. And, maybe, in the future when I need to remember how to use a voltage divider I will remember that I wrote this down and I don't have to go searching all over the Internet again for the solution.

Author Interviews: My Thoughts on Types of Interviewers

Recently I was at Digital Book World with my friend Len Edgerly from The Kindle Chronicles podcast. He and I have had an ongoing discussion about what makes a good interview. At Digital Book World (DBW) we talked specifically about interviews with authors.

This came up at DBW because Kathy Doyle from Macmillan Publishers was there and answered an audience question concerning suggestions for authors who who have been approached for an interview. I think she gave some good tips which included listening to other interviews that the interviewer has done to get a feel for what their style is.

Photo of Kathy Doyle, Len Edgerly and David Peach
Kathy Doyle, Len Edgerly, David Peach


That brings us back to types, or styles, of author interviews. I have identified three types that I like for different reasons. As an author looking to do an interview with a podcaster or radio station, I think you should try to figure out what the purpose the interviewer is trying to accomplish by having you on their program.

Tell Me About the Author

Sometimes I am less interested in the book than I am the author and their story. This is the type of interview I enjoy on shows like The Kindle Chronicles. I like hearing the story of how the author got to where they are and what types of books they have written.

This type of interview will certainly talk about the author’s latest book, but I don’t listen to these types of programs to learn about books. I listen for the human interest story of how an author ended up where they are.

Tell Me About the Book

Then there are times when I am much more interested in the book than I am the author. For example, The Art of Manliness podcast does many author interviews. I enjoy these, not because of who the author is, but because of what the book is about.

In this type of interview I am wanting to hear about the content of the book. I want to find out if this is a book that I would be interested in buying.

In this interview type the host of the podcast, or other media outlet, has selected the author and book because it fits with their theme. Therefore, the theme of the book is the greater focus in this type of interview.

Tell Me What the Host Wants Me to Know

The third type of author interview that I enjoy is one where the host directs the questions to get the information out of the author that the host is interested in sharing. Todd Henry at The Accidental Creative podcast is a master at this.

Todd is not asking the author to come on the show to talk generically about their work. Todd has a very targeted topic and he interviews authors for the purpose of getting them to share targeted content for the listeners. He is brilliant at asking questions that pull out the few specific points that he wants to share with his audience.

In this type of interview the author may not have a chance to talk about the book as a whole, but may only cover a few select themes covered in the book. That is perfectly fine since the host has an agenda and a reason for sharing the author with his listeners.

Which Format is Best

There is no single best type of author interview. Each of these three interview types has a specific purpose. It would behoove an author to take the time to listen to a few interviews by the host and find out what the host wants to share with the audience. If you don’t hit the target, or especially if you don’t try, then your time may be wasted and the interview may never be played. I have done my share of interviewing and there are times when an interview never makes it out of the recorder because the guest never really understood what the purpose of the interview was.

If you are an author, take the time to learn why the host wants to talk with you. In the process, you may find new readers because they heard what they were listening for in that show.

Comments on KnowHow’s TinkerCAD Tutorial

Allow me to first say that, while I am disagreeing on a couple of points and correcting some of the comments made in this video, I did learn from it and I understand that @padresj is trying to keep this simple. There were a couple of things I did not know about TinkerCAD that I learned from the video.

The purpose of this post is to just make a few comments and answer some of the questions that came up with an alternative way of doing things.

Chromebook

At 3:53 Padre says that a Chromebook might not be the best choice for running TinkerCAD. However, my run-of-the-mill, average Chromebook from 2014 does fine for most stuff. I have rarely felt like my local computer was the cause of any problems. It is usually related to the quality of the internet connection. When starting out, you probably won’t overtax a Chromebook’s ability. My point is, don’t be afraid to try if all you have is a Chromebook.

You definitely want a regular mouse connected to your machine. One with a scroll wheel and middle-click button are best. (Is there such a thing as a scroll wheel mouse that doesn’t have middle click anymore?)

Moving Around the Build Plane

At 21:53 Jason asks about moving around the build plane. Padre said that it is not possible to do what Jason wanted. But it is possible by using the middle-click button on the mouse. You can use the mouse’s middle button to control the point of focus. However, using the F key on the keyboard to lock focus on an object is pretty slick and easy (one of those features I did not know existed).

Stacking Shapes

At 25:35 Jason wants to drop one shape onto another. This is an advanced technique, but Padre seemed to not know this. At first I thought it was that he did not want to explain the technique because it is more complicated. But, based on what else he said, I’m not sure he actually knows this ability exists.

You can stack shapes by adding another build plane (the software calls it a workplane) to the face you want to stack an object on. Use the Workplane icon to drag a new orange (temporary) workplane onto an object face. Then click the object you want to stack and hit the letter D.

The face that the new workplane goes on does not have to be a top or bottom face. It can be a side face. You can also choose a new workplane before bringing a new object onto the modeling area. Doing that will let you place text or other objects  onto the workplane in the correct orientation.

To delete the temporary workplane and get back to the standard one select Workplane again and click anywhere outside the current temporary one.

Copy VS Duplicate

At 42:28 Padre says to use CTRL-C and CTRL-D to make a duplicate in the same place. You don’t need the CTRL-C step. By itself, CTRL-D makes a duplicate of the selected object.

If you want to paste an object, not in the same place, then you need to use CTRL-C and then CTRL-V. I can’t think of any time when doing this is better than just making a duplicate in place.

There are some interesting duplication rules in TinkerCAD that you may want to explore, but they are more advanced than this video is trying to be.

Aligning Objects

Starting at 47:30 Padre goes into a convoluted explanation of how to make a box smaller by subtracting 2 mm off of each side of the duplicate box so that you can keep them both centered. There is a much easier way to align 2 (or more) objects than trying to subtract a certain amount from each side of an object

Select the objects you want to align and choose the alignment tool. Alternately, after choosing the objects you can press the letter L on the keyboard. Once the tool is active, use the control dots to align the objects to each other in various ways. You can align left/right/center, front/back/center, or top/bottom/center. To accomplish center alignment, like in the video, you would choose the two center alignment dots on the build plane.

Micrometer

I agree that a good set of calipers/micrometer is better than the cheap ones. And sometimes it makes sense to spend money on better tools at the beginning. But this is one where I disagree with Father Robert. Buying a cheap set (sub $20) may be all you ever need. If you decide that 3D modeling is not for you, then there is no reason to have a $40 tool lying around that you will never use again.

I’ve had my $15 Harbor Freight calipers for over a year and have never had to replace the batteries (a complaint he has shared previously), nor had them fail in any way. I understand that better tools are likely to perform better and last longer, but this is one where I think I would recommend something inexpensive to get you into the field as opposed to scaring you off by suggesting a more expensive tool.

Thanks for the great video. I did learn a few things along the way. I just hope that some of the extra tips help make using TinkerCAD a bit more enjoyable.

Wanhao Duplicator i3 Plus Conversion: Firmware

For my Wanhao i3 Plus clone conversion to a RAMPS setup, I chose Marlin as my firmware. This is for practical reasons more than because I have a strong opinion one way or another. I have read much more about Marlin than any other firmware and I have a friend who runs a Marlin variant for his printer; therefore, I know I can lean on him for configuration help.

I will not go into every small step of setting up and configuring Marlin. There are plenty of guides online that can do a much better job. What I do want to cover are the configuration options that you need to know specifically for the Wanhao Duplicator i3 Plus and its various rebranded counterparts.

Basic Parameters

  • 200, 200, 180 mm build volume (X, Y and Z respectively)
  • Extruder steps per mm: 96
  • X steps per mm: 80.15
  • Y steps per mm: 80.15
  • Z steps per mm: 399.5

The steps per mm numbers above are what mine is currently set to. I am still doing some tuning to make things more precise, but this should get you started. I would assume that your numbers would be identical to mine assuming you still have the stock motors, belts and drive screws. However, other settings inside of Marlin could affect these numbers.

Configuration Changes

I will paste my full configuration.h file below, but here are the lines that I have changed. I will put the line number as it appears in the original Marlin 1.1.x configuration.h file. Listed below are what they were changed to for getting my printer working, but not necessarily perfect. I don’t anticipate that I will update this document with every little change I make in the future.

  • Line 275: #define TEMP_SENSOR_BED 1
  • Line 326: #define PID_AUTOTUNE_MENU
  • Line 339: #define DEFAULT_Kp 25.83
  • Line 340: #define DEFAULT_Ki 1.49
  • Line 341: #define DEFAULT_Kd 112.15
  • Line 475: #define X_MIN_ENDSTOP_INVERTING true
  • Line 476: #define Y_MIN_ENDSTOP_INVERTING true
  • Line 477: #define Z_MIN_ENDSTOP_INVERTING true
  • Line 512: #define DEFAULT_AXIS_STEPS_PER_UNIT { 80.15, 80.15, 399.5, 96 }
  • Line 527: #define DEFAULT_MAX_ACCELERATION { 3000, 2000, 100, 10000 }
  • Line 537: #define DEFAULT_ACCELERATION 1500
  • Line 764: #define Z_MAX_POS 180
  • Line 1231: #define ENCODER_PULSES_PER_STEP 2
  • Line 1237: #define ENCODER_STEPS_PER_MENU_ITEM 2
  • Line 1254: #define REVERSE_ENCODER_DIRECTION
  • Line 1262: #define REVERSE_MENU_DIRECTION
  • Line 1364: #define REPRAP_DISCOUNT_FULL_GRAPHIC_SMART_CONTROLLER

Configuration Details

Lines 1231 and down have to do with the particular LCD display that came with my RAMPS board. You will have to look around for the settings for the display you are using. Mine says “RepRapDiscount Full Graphic Smart Controller” below the LCD.

Line 275 sets the type of thermistor for the heated bed. I uncommented line 326. This was to turn on a PID autotune feature on the control unit. PID is set with lines 339-341. The endstops have to be switched to true because on the Wanhao printer they are wired NO (normally open) as opposed to NC (normally closed).

The DEFAULT_AXIS_STEPS_PER_UNIT on line 512 is to set the motor driver steps. This is a line that you will adjust to dial in how far each step on the motor actually is. You can read the long and detailed version of axis calibration at the RepRap Wiki or check out this Instructable about calibration to get you started.

527 and 537 were changes I made because I was getting a drastic y-axis shift. It turned out the shift was due to the motor driver overheating. With a fan blowing on my RAMPS board I no longer have that problem. I may change lines 527 and 537 back to the default numbers to get more speed out of the printer.

That should be enough information to get you up and running with Marlin. Then you can spend the next 3 years continuing to tweak these settings and many other parameters.